
If you’ve ever wished you could just tell an AI assistant “add these three contacts to Odoo” instead of clicking through forms, that’s exactly what Odoo MCP makes possible.
What Is Odoo MCP?
Odoo MCP is a bridge server that exposes your Odoo instance as a set of tools an AI agent can call. Instead of writing custom scripts or clicking through the Odoo UI, you can ask your AI assistant in natural language to search records, read data, or create new entries and it executes those actions against your actual Odoo database through the MCP server.
Why It’s Useful?
- You can ask your copilot to create contacts, orders, or records in plain English instead of manual form filling.
- Spin up test data on the fly while working in your editor, without switching windows.
- Since it plugs into VS Code via Copilot (or other MCP-compatible clients), it fits into a developer’s normal workflow.
- Good MCP clients show you what tool the AI is calling before/while it runs, so you can see exactly what’s happening under the hood rather than trusting a black box.
Step 1: Install the Odoo MCP Server
Odoo MCP servers are distributed as Python packages and run through uvx (part of the uv Python tool), so you don’t need to manually clone or build anything.
- Install
uvif you don’t already have it (see the uv docs for your OS, it ships auvxcommand alongside it). - That’s it for setup and you don’t need to separately “install” the Odoo MCP package. When VS Code launches the server (Step 4),
uvxwill automatically fetch and run it on demand the first time it’s needed.
If you want to sanity-check the package works before wiring it into VS Code, you can run it directly from a terminal:
uvx mcp-server-odooYou should see it start up without errors. Press Ctrl+C to stop it and VS Code will handle starting/stopping it going forward.
Step 2: Set Up Your Odoo Database
Before connecting the MCP server, you need a running Odoo instance with a database you’re happy to test against (don’t point this at production data on your first try).
When creating your database, fill in:
- Database Name : e.g.
TestMCP - Email : this becomes your admin login
- Password : your admin login password
- Leave Demo Data unchecked unless you want sample records
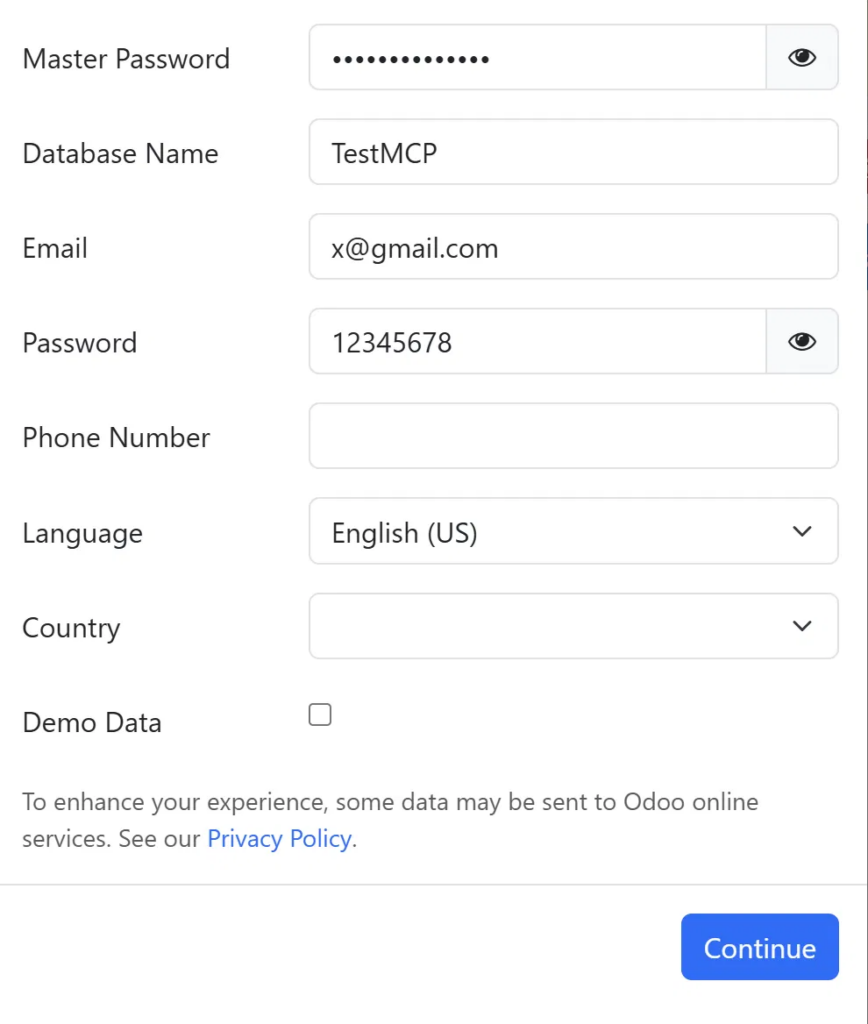
These same credentials database name, email, and password will be reused directly in your MCP configuration, so keep them handy.
Step 3: Configure mcp.json in VS Code
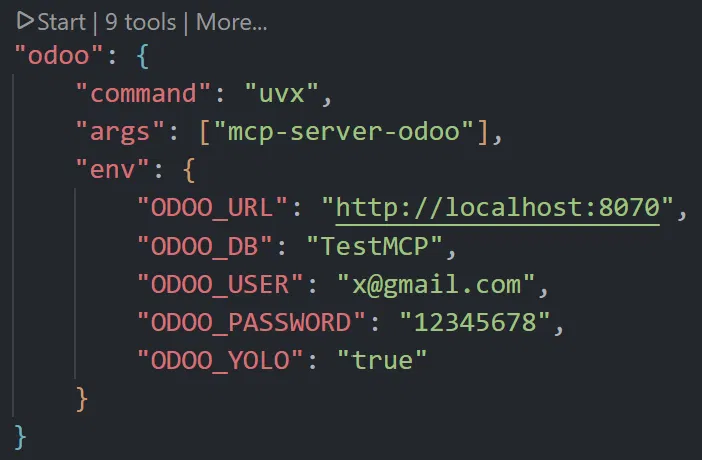
Next, tell VS Code how to launch the Odoo MCP server. Open the command palette (Ctrl+Shift+P),

search for “MCP: Open User Configuration”, and add an entry like this:
"odoo": {
    "command": "uvx",
    "args": ["mcp-server-odoo"],
    "env": {
        "ODOO_URL": "http://localhost:8070",
        "ODOO_DB": "TestMCP",
        "ODOO_USER": "x@gmail.com",
        "ODOO_PASSWORD": "12345678",
        "ODOO_YOLO": "true"
    }
}
A quick breakdown of the fields:
| Field | What to put |
|---|---|
ODOO_URL | The URL of your running Odoo instance (local or hosted). Be sure to verify that you’re using the correct port configured in your Docker Compose file. |
ODOO_DB | The exact database name you created in Step 2 |
ODOO_USER | The admin email/login you used when creating the database |
ODOO_PASSWORD | The matching admin password |
ODOO_YOLO | Enables write actions (create/update) without extra confirmation gates, it is useful for testing, but be deliberate about turning this on |
The credentials in your mcp.json need to match a real, working login on your Odoo instance with same database name, same email, same password. If Odoo is running locally, double check the port (in this example, 8070) matches what your instance is actually bound to.
Step 4: Start the MCP Server
Once your config is saved:
- Open the Command Palette (
Ctrl+Shift+P) - Search for MCP: Open User Configuration (or just look for your
mcp.jsonfile) - VS Code will detect the new server entry and start it, you should see something like :
Step 5: Use It with GitHub Copilot
With the server running, open a Copilot chat in VS Code and just ask for what you want in plain language:
Add 3 contacts with name x, y, z to odoo contactWatch Copilot’s “thinking” trace as it responds and you should see entries like:
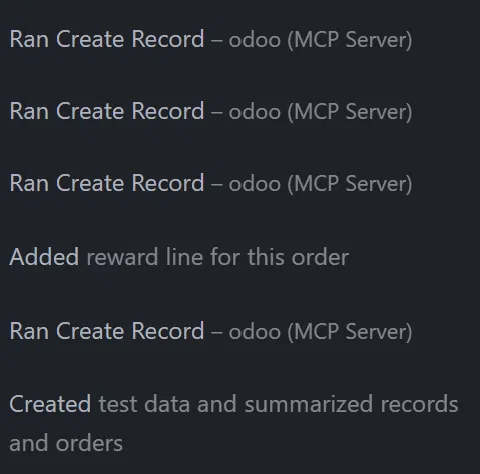
This confirms Copilot isn’t just describing what it would do but it’s actually calling the Odoo MCP tool and writing real records into your database. You can go check your Odoo Contacts app afterward and see the new entries there.
A Few Practical Tips
- Start on a disposable test database. Since MCP gives an AI agent write access to your data, it’s worth confirming behavior on a sandbox database before pointing it at anything real.
- Watch the tool-call trace. Good MCP clients surface exactly which tool was called and with what data, use that visibility to sanity-check what the AI is doing, especially before enabling unrestricted write modes.
- Keep credentials out of shared configs. Since
mcp.jsonholds your Odoo password in plain text, treat it like any other secrets file and don’t commit it to a public repo.
Wrapping Up
Odoo MCP turns your AI copilot from a chat window into something that can genuinely act inside your business systems like searching, reading, and creating records without you touching the Odoo UI. It’s a small setup (install uv, a database, a JSON config, one restart), but it changes how you interact with Odoo day-to-day, instead of navigating menus, you just describe what you need.
If you’re testing this out, start small, stay on a sandbox database, and get comfortable watching what the AI is actually doing before you hand it broader write permissions.